
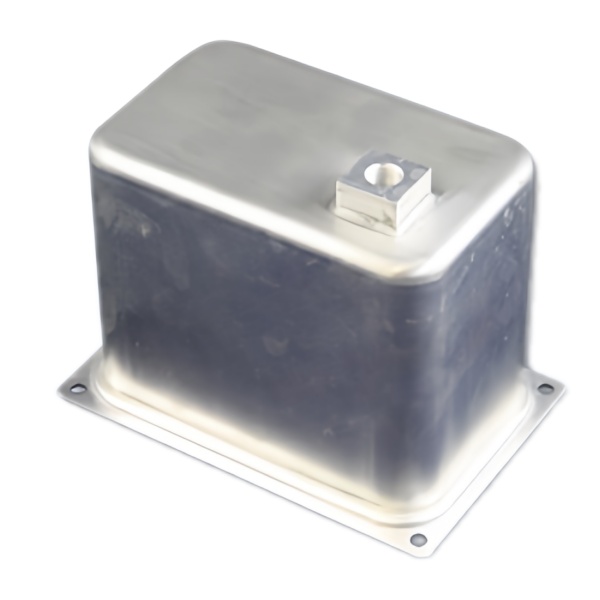
A threaded boss in a drawn wall is an interface decision
An aluminium enclosure with a threaded boss is usually described as a housing with a mounting point. That description hides the real problem, which is that the boss is where a fastener, a cable gland, a stud or a connector enters the enclosure, and every one of those parts arrives with its own stiffness, its own coefficient of expansion and its own idea of how tight it should be. The drawn wall carries nothing more than an opening; the boss carries the joint. Getting the boss right is a question about which of four or five very different constructions will be used, and that question has to be answered before the enclosure is drawn, not after the first article comes back with a stripped thread.
Aluminium makes this harder than steel for two reasons that have nothing to do with strength. It galls when rubbed against a dissimilar metal, so a stainless steel fastener in an aluminium thread can seize and shear its own threads on the way out. And it grows when anodised, so a thread that was dimensionally correct when it was cut may be too tight after finishing. Both are avoided by design decisions taken early and both are extremely expensive to correct afterwards.
Four ways to get a thread, and what each one costs
There is more than one way to put a thread in a thin drawn wall, and they are not substitutes. The choice depends on the load, the number of assembly cycles, whether the joint must be sealed and what the enclosure has to look like from outside.
- A formed and tapped boss. Metal is extruded upward from the wall by a punch, producing a collar, and the collar is then pierced and tapped. The thread is formed in the parent metal and is continuous with the wall. This is cheap and leaves a smooth closed surface externally, and it is limited by how much material there is: the wall must be thick enough, or the boss tall enough, to give an acceptable number of threads.
- A threaded insert pressed or riveted in. A brass or stainless steel threaded insert is set into the hole and is held by knurling, by a flange, or by deforming the wall into an undercut. This gives a strong steel or brass thread in an aluminium panel, it isolates the fastener from the aluminium and it removes the galling problem entirely. The cost is a second component and a setting operation, plus the requirement that the panel must be flat enough for the insert head to seat.
- A machined boss on a thickened pad. A local pad is coined or coined and machined into the wall so that the thread sits in solid metal. This is the strongest option and the most tolerant of assembly abuse, and it costs material and weight and is the least able to be done in one press pass.
- A separate boss welded or bonded on. A turned boss is joined to the wall by welding, by friction stir welding or by structural adhesive. This recovers the strength of solid metal without thickening the panel, and it introduces a joint, a heat affected zone and a distortion risk in a thin aluminium wall.
For most enclosures the choice narrows to the formed and tapped boss where the load is light and the wall is thick enough, and to a pressed insert where the thread will be used repeatedly or where the wall is thin. If the thread has to be sealed against liquid, the boss construction and the sealing method have to be chosen together, because a formed boss has no sealing face unless one is specified.
Wall thickness, boss height and engagement
Thread strength in aluminium comes mostly from engagement length, not from wall thickness, and this is the point that a thin wall drawing tends to miss. The load a thread can carry grows with the number of engaged threads up to a limit, beyond which the bolt breaks instead of the thread stripping. For a steel nut that limit is reached at roughly 0.8 times the diameter of engagement. For aluminium it is higher, because the material is weaker in shear, and a working figure for a common 6061 or 5052 enclosure is an engagement of at least 1.5 to 2.0 times the nominal diameter. On an M3 fastener that is 4.5 to 6 mm of usable thread, which is a tall boss for a wall of 1.5 mm.
There are only three ways to get that engagement out of a thin wall, and they are worth stating plainly. The boss can be extruded up out of the wall so that the collar supplies the length. The wall can be locally thickened before the boss is formed, which costs a coining operation. Or the thread can move to an insert that supplies its own length. A drawing that asks for an M4 thread in a 1.2 mm wall with no boss and no insert is asking for about three quarters of a turn of engagement, which will strip at something like a fifth of the torque the designer had in mind. This is the single most common defect in this class of part and it is entirely preventable on paper.
- State the thread size, the class and the minimum usable engagement length.
- Give the boss height from the outer surface and the wall thickness separately.
- Say whether the boss may be extruded or must be machined, because the two produce different thread strengths.
- Name the fastener material, because an aluminium thread with a stainless steel fastener is a galling risk that a mild steel fastener does not have.
Aluminium galling: the fastener is part of the specification
Aluminium and stainless steel, or aluminium and zinc plated steel, will gall when a threaded joint is tightened and loosened repeatedly. The mechanism is a combination of high local pressure, the absence of a stable oxide film that reforms slowly, and the tendency of the two metals to cold weld at asperities. The result is that the fastener becomes progressively harder to turn, then suddenly seizes, and on removal it either shears or strips the aluminium thread. The failure arrives without warning and it looks to the operator like an over-torque, which makes it very hard to diagnose after the fact.
Four remedies are available and any one of them is enough. Using a fastener of the same alloy family removes the dissimilar metal couple but is often impractical. Coating the thread, either with an anti-seize compound or with a dry film lubricant, is the usual answer in service. Using a thread that will not gall by moving to an insert removes the problem permanently. And reducing the assembly speed and the number of assembly cycles keeps the joint inside the regime where galling does not start. Whichever is chosen, the drawing should name the fastener condition, because the enclosure will be assembled by someone who did not read the design intent.
Anodising grows the boss and changes the thread
Anodising is not a coating that sits on the surface. It converts the outer layer of the aluminium into an oxide that occupies more volume than the metal it replaced, and about half of the growth appears outside the original surface. A decorative anodise of 10 to 15 microns grows the surface by 5 to 8 microns. A hard anodise of 40 to 50 microns grows it by 20 to 25 microns. That growth matters in three places on this part.
On a thread, the growth on both flanks closes the pitch diameter. An M4 thread with a 0.7 mm pitch has a flank separation that is small compared with the thread’s diameter, and a radial growth of 20 microns closes the effective diameter by about 40 microns, which is enough to make the fastener tight in the thread and to change the torque for a given preload. On a locating diameter, the growth changes the fit, and a bore designed to slide will not slide. On a sealing face, the growth moves the metal that the seal is supposed to sit against.
The three practical responses are to mask threads and sealing faces before anodising, to tap the thread oversize so that the finished thread lands on nominal, or to specify the thread dimension as measured after anodising. Masking is the cleanest and it leaves bare aluminium inside the thread, which brings the galling question back into play and is why a masked thread usually comes with a lubricant specification. Hard anodising is worse than decorative anodising in every one of these respects and should not be applied to threads without a deliberate decision.
How we verify an enclosure with a threaded boss before it ships
An enclosure with a threaded boss is verified on the boss above all, because that is where the part is weakest and where assemblies fail: pull-out, thread function and the effect of anodise on the thread. The first article proves the boss; production bosses are gauged and pull-tested on a sampling plan.
- Torque or pull-out test the boss on the first article to the specified load with a margin; record the failure mode so we know which direction it yields.
- Functional thread check with go/no-go after anodise, because the coating can close a tight thread below minimum.
- CMM the boss position and perpendicularity to the wall so the fastener loads the wall instead of cantilevering it.
- Confirm wall thickness at the boss base; a thin wall under a loaded boss tears out regardless of thread strength.
- Check the enclosure sealing face and any pierced hole against the print.
- File the pull-out report, thread gauge and anodise thickness record under the part number.
Draw ratio, wall thinning, radii and trim — the design decisions behind a part like this are worked through with numbers in our deep drawn covers guide, and the Precision Deep Drawn Parts pages collect the rest of the family.
Specifications
| Item | Aluminum Deep Drawn Enclosure with Threaded Boss |
|---|---|
| Brand | AUNOV |
| Designing | Send us your 2D drawing, or mail a sample for measurement, our engineers reply with a manufacturability assessment and pricing. |
| Tooling | Every die designed and built in our toolroom, stored under your part number. |
| Samples | The first-article set ships with a full dimensional report and material certification. |
| Materials | Stock for this part leads with aluminium, alongside carbon steel (SPCC / DC01), 304 / 316 stainless steel, brass and copper, with the final grade confirmed at the drawing review. |
| Surface finish | Plating, e-coat, powder coating, anodising or passivation, selected against the drawing requirement. |
| Processing | Multi-stage drawing, annealed in line where wall thinning calls for it, then pierced and CNC-machined in house. |
| Equipment | 5-250 T mechanical presses plus 250-500 T hydraulic presses, CNC cells plus a temperature-controlled CMM room. |
| Tolerance | As-drawn tolerance +/-0.1 mm, +/-0.03 mm on machined features. |
| Delivery terms | FOB is standard; DDP offered for EU and US, T/T or L/C, with D/P for repeat business, blanket orders and call-offs supported. |
Frequently Asked Questions
Why is a threaded boss an interface decision, not just a hole?
The boss is where a fastener, cable gland, stud or connector enters, and each arrives with its own stiffness, expansion and torque. The construction – insert, welded nut, tapped wall or formed thread – is chosen before the enclosure is drawn, because a stripped thread is expensive to fix afterwards.
Why does aluminium galling matter on a threaded boss?
Aluminium rubs against a dissimilar metal and can seize, so a stainless steel fastener in an aluminium thread may shear its own threads on removal. Thread inserts or compatible plating avoid it, and the material pairing is decided early.
How does anodising affect the boss thread?
Anodising grows the coating, so a thread that was correct when cut may be too tight after finishing. The boss is sized for the finished state, not the bare one, and the thread is measured after anodise rather than before.
How is an enclosure with a threaded boss verified?
The boss engagement and thread are checked after finishing, with the grade and temper matched to the duty. The typical minimum order is 1,000 pieces with a 24-hour quotation.
Related Products


Request a Quote for This Part
Send a drawing or sketch — get material advice, tooling cost and a per-piece price within 24 hours (working days).