
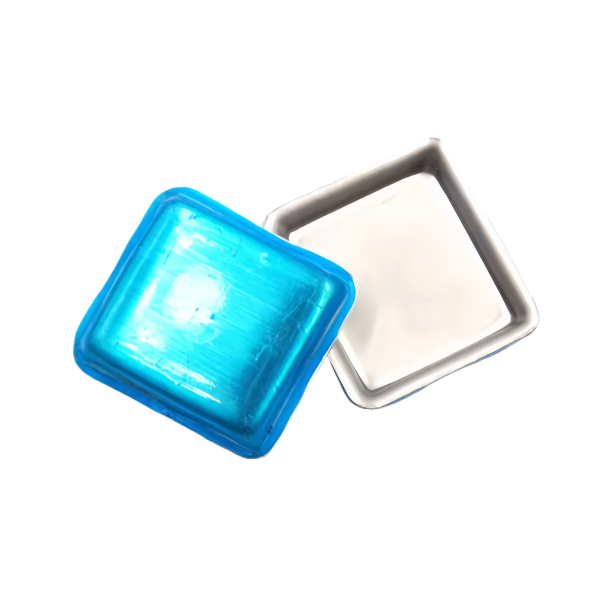
A square dish is a corner-radius problem before it is anything else
An aluminium square dish looks like an easy shallow draw until you look at the corners. A round shell draws symmetrically and the material flows evenly; a square dish has four corners where the material has to travel much farther than it does along the flat sides, and those corners are where wrinkling, thinning and cracking all compete. The corner radius is therefore the most important number on the drawing, and it is also the number a square dish drawing most often leaves out, specified instead as a sharp “square” corner that the process cannot actually make without a feature.
We draw these on the small mechanical presses with dedicated tooling, holding the as-drawn envelope to roughly +/-0.1 mm and machining any locating face to +/-0.03 mm. Aluminium in the 1.0 to 2.0 mm range is our usual stock for a dish this size. The anodized finish is applied after forming, and the whole flatness and corner behaviour is planned around the fact that anodizing will grow the part by its coating thickness afterwards.
The anodized dish is one of those parts where the finish and the form are planned together from the first station, and that planning is what we log against your part number. A reorder therefore starts from recorded anodize and draw settings rather than a retune, and the corner radius that worked on the first article is the corner radius we hold on every later batch, so the dish you get in month twelve matches the dish you approved in month one.
The earing pattern on a square aluminium dish is worth a word, because it decides the rim. Drawn aluminium develops lobes at the edge from grain direction, and on a square dish those lobes sit at the corners and the flat sides differently. We orient the blank or trim the rim so the lobes do not eat into the usable flange, and we note the trim allowance on the first article so the finished size is what the drawing calls for.
Anodize colour consistency across a batch is a real control, not a cosmetic nicety. A dish that is clear-anodized can drift toward yellow or grey if the bath or the alloy temper varies, and on a visible part that is a reject. We hold the anodize to a reference sample agreed up front and we check the first article against it, because “clear” covers a visible range.
The trade between a thicker dish and a heavier anodize is one we make explicit. A dish that needs more corrosion life can get it from a heavier anodize, which grows the part, or from thicker aluminium, which costs more in material and draws harder. We present both and let the dimension budget decide, rather than defaulting to the heavier coat that then fights every post-coat tolerance.
Drawing aluminium into a square: the work-hardening window
Aluminium work-hardens fast, which is a blessing and a trap on a square dish. It hardens as it draws, so a second stage that would be easy on steel can crack aluminium if the first stage already hardened the corner. We plan the reductions to stay inside the material’s formability at each stage, and on deeper or tighter-cornered dishes we anneal between draws so the corner gets another chance to flow rather than fracture.
- The 1 mm wall is the threshold. Below about 1.0 mm the dish is thin enough that the forming step, not the tolerance, decides the flatness, and the die polish and blank holder pressure matter more than the press tonnage.
- The corner radius sets the wrinkle. Too tight a radius and the corner material bunches and wrinkles; we open the radius just enough to let it flow, and we record the value that worked on the first article.
- The side walls need draw beads or a holder, or the flat sides pucker while the corners stretch, leaving a dish that is tight at the corners and loose on the faces.
- Grain direction shows up as earing, the four or eight lobes at the rim that appear when the blank grain is unbalanced, and we orient or trim to keep the rim usable.
Anodizing grows the part, so every anodized dimension is a before-coat dimension
Anodizing is not a paint; it is a controlled conversion of the aluminium surface into a thicker oxide layer, and that layer adds material on every exposed face. On a square dish that growth is enough to change a press-fit rim or a locating step, so the drawing has to state which dimensions are before anodize and which are after. A dish specified only at finished size will be oversize the moment it leaves the anodize tank, and a rim that was a sliding fit becomes a press fit that will not enter.
We treat the anodize thickness as a tolerance of its own. A typical decorative or protective anodize adds single-digit microns per face, but on a tight rim or a small locating feature that is a real fraction of the clearance. We advise stating the anodize class and the post-coat dimension on the features that matter, and we measure the finished dish at the post-coat size so the report matches what the customer receives.
The practical rule we apply is to anodize after all forming and machining is complete, never before, because any sizing or trimming after the coating would strip it where it matters. Where a feature must stay bare aluminium for bonding or conduction we mask it before anodizing, and we confirm the mask on the first article so a conductive face does not come back coated and useless.
Sealing the anodized layer, or the dish stains in the field
An anodized coating is porous straight out of the anodize bath, and if it is not sealed it will pick up dyes, fingerprints and stains and it will corrode in a way that looks like coating failure but is really unfinished process. Sealing closes those pores, typically in a hot nickel- or cold-seal bath, and it is a required step for a dish that will see handling or a wet environment, not an optional upgrade.
- We confirm the seal on the first article, because an unsealed dish that looked fine in the box can bloom with stains within weeks of use.
- We match the anodize type to duty: clear sulphuric for general protection, hard anodize where the dish sees wear, and a dyed finish only where appearance is specified and the dye is sealed in.
- We keep the anodize off features that must conduct or must bond, by masking, because an anodized surface is an insulator and a poor glue base unless that is planned for.
Flatness of a thin square dish, and what the forming owes the assembly
A shallow square dish is judged by how flat its open face stays, because that face is usually what the assembly closes against or what sits in a fixture. Thin aluminium wants to spring back and to warp from residual stress after the draw, and a dish that left the die flat can curl slightly once it relaxes. We control this with die design, with a final sizing or restrike station, and with stress relief where the flatness call is tight.
The flatness we can hold on a drawn dish is wider than the +/-0.03 mm we put on a machined face, because the forming process sets it. Where the assembly truly needs a flat seat we either restrike the rim or we machine a register after forming, and we tell you which approach the drawing should call for rather than leaving it to chance. Specifying the whole dish to machining flatness costs real money for no gain on the walls.
How we verify an anodized square dish
Verification covers the shape, the coating and the flatness together, because on this part they interact. The routine:
- First-article CMM report on the envelope, corner radii and any machined face, at the stated (before or after anodize) condition.
- Anodize thickness check on the finished dish, confirmed against the class written on the drawing.
- Seal quality test on the first article, so the porous-as-produced coating is proven closed.
- Flatness measurement on the open face, against the call, with a restrike or machining note where it was needed.
- Appearance agreement against a reference sample where the finish is visible, because “clear anodize” covers a range of looks.
- Material certificate confirming the aluminium grade and temper that the forming plan assumed.
The dish ships with its dimensional report and certificate under your part number, and the forming and anodize settings are archived so the next order repeats the same process rather than relearning the corner radius.
Send a drawing or a sample of the dish and state the anodize class and the post-coat dimensions on the features that matter. We return a manufacturability review with the quotation and a first article that proves the corner radius, the coating thickness and the flatness together, so the dish you approve is the dish you get.
Our deep drawn covers guide puts numbers to the design decisions behind a part like this — draw ratio, wall thinning, radii and trim; the Precision Deep Drawn Parts pages collect the rest of the family.
Specifications
| Item | Aluminum Deep Drawn Square Dishes Anodized |
|---|---|
| Brand | AUNOV |
| Designing | Send the drawing, or a sample we can measure, you get a DFM review together with the quotation. |
| Tooling | Every die designed and built in our toolroom, stored under your part number. |
| Samples | First-article samples ship with dimensional data and material certification. |
| Materials | Aluminium is the primary stock for this part, alongside carbon steel (SPCC / DC01), 304 / 316 stainless steel, brass and copper, and the grade is fixed at the drawing review. |
| Surface finish | Surface treatment per the drawing: plating, e-coat, powder coating, anodising, passivation, as called out on your print. |
| Processing | Multi-stage drawing, annealed in line where wall thinning calls for it, with piercing and finish machining under the same roof. |
| Equipment | Press capacity from 5 to 500 T across mechanical and hydraulic lines, in-house CNC cells and a temperature-controlled inspection room. |
| Tolerance | As-drawn tolerance +/-0.1 mm, +/-0.03 mm on machined features. |
| Delivery terms | FOB as standard, DDP available for EU and US destinations, T/T and L/C; D/P on repeat accounts, call-off scheduling supported. |
Frequently Asked Questions
Why is the corner radius the most important number on a square dish?
A round shell draws symmetrically, but a square dish has four corners where material has to travel much farther than it does along the flat sides, and those corners are where wrinkling, thinning and cracking all compete. A corner specified as a sharp square cannot be drawn without adding a feature to absorb the material.
Does anodising change the finished dimensions of the dish?
Yes. Anodising grows the part by its coating thickness, which is why every anodised dimension has to be given as a before-coat dimension. The draw is planned around that growth rather than hoping the finished part still lands in band.
Why does the anodised layer have to be sealed?
An unsealed layer is porous and the dish stains in the field, on a part that is meant to look clean every time it is handled. Sealing closes the pores, and that is the difference between a decorative finish and one that stays presentable.
How flat can a thin square dish be held?
The whole flatness behaviour is planned around forming followed by coating growth, because the sequence changes the result. The as-drawn envelope is held to roughly +/-0.1 mm and any locating face is machined to +/-0.03 mm.
Related Products


Request a Quote for This Part
Send a drawing or sketch — get material advice, tooling cost and a per-piece price within 24 hours (working days).