
What the tab is for, and both answers are legitimate
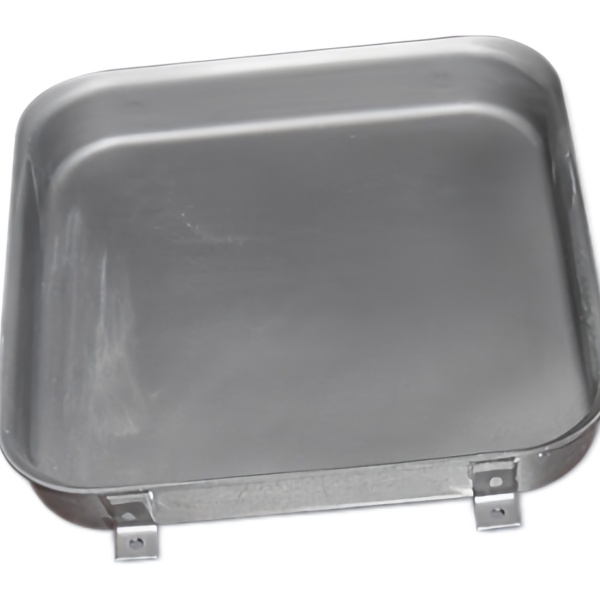
A cover pan with mounting tabs is a part where the tabs are usually drawn last on the drawing and thought about first in the field. The design intent behind a tab is almost always one of two things, and they are opposites. Either the tab is meant to locate the cover positively against a surface, in which case it must be rigid and its position must be controlled, or the tab is meant to hold the cover down while absorbing the mismatch between the cover and whatever it is mounted to, in which case it should be compliant and its position matters much less than its flexibility. Both are correct engineering and both look identical on a drawing that says four tabs, 20 by 15, with a 6.5 mm hole.
Mixing the two intents is where trouble starts. A cover whose tabs are meant to be compliant will rattle if the tabs are formed too stiffly, because the flexibility that was supposed to absorb the gap is no longer there and the whole assembly moves instead. A cover whose tabs are meant to be rigid will crack at the tab root if the tabs are formed too thin, because every assembly gap now loads the tab in bending rather than being taken out by deflection. The first question about this part is therefore not a tolerance question at all. It is which of the two jobs the tabs are doing.
The root of the tab is where this part fails
If a tabbed cover comes back from the field with a crack, the crack will be at the tab root, in the radius where the tab turns out of the pan wall or the flange. This is the location of maximum bending stress under any load on the tab, and it is simultaneously the location where the material has been work hardened by the forming operation. Both effects point at the same place, which is what makes this failure so consistent.
Three numbers control the risk. The inside radius should be at least the material thickness and preferably twice it; a sharp root concentrates strain and becomes the crack initiation site. The tab width relative to the material thickness sets how much the tab can deflect before it starts to yield; a narrow tab in thin steel will bend plastically under normal handling. And the tab should not be pierced so close to the root that the hole removes the material that the radius needs. A hole whose edge is nearer than 1.5 times the material thickness to the root radius puts the highest stress in the thinnest section, which is a failure waiting for a load.
- Root radius one to two times the material thickness, formed, not sheared.
- Tab width and thickness chosen so that normal handling stays elastic.
- Hole edge at least 1.5 material thicknesses clear of the root radius.
- Where the tab must be stiff, add a rib along the tab rather than increasing its thickness.
The load path, in four steps
Every load on this cover travels the same route, and it is worth writing out because the weak point is usually not the one people expect. The force enters through the bolt or screw, passes through the fastener into the tab, crosses the root radius into the pan wall or flange, and then spreads through the pan into whatever the pan is seated against. Four steps, and each one can be the limiting factor.
- The fastener to tab interface. A bolt tightened onto a thin tab will dish the tab if the washer is small; the load is carried by the contact area under the head. A larger washer or a dimpled tab spreads it.
- The tab in bending. This is where a compliant tab does its work and where a rigid tab accumulates stress. Length matters more than thickness: a tab twice as long deflects roughly eight times as much for the same load, which is why elongating a tab is such an effective way to make it compliant.
- The root. Bending stress concentrates here and so does the forming strain. This is the step that decides fatigue life.
- The pan wall and the seating face. If the pan is drawn from thin steel, the wall may deflect before the tab yields, which shows up as the whole cover flexing rather than as a cracked tab.
Knowing which of the four steps is soft is what determines the fix. A tab that cracks needs a bigger root radius or a shorter tab. A cover that rattles needs stiffer tabs or a compliant gasket under the flange. A cover that flexes in the middle needs a bead or a rib in the pan rather than stronger tabs.
Four tabs, one plane
This is the geometry problem that gets underestimated on every tabbed part. The tabs have to be coplanar with each other if the cover is to be bolted down without distortion, and the pan geometry wants to be controlled at its own flange or rim. On a drawn pan, those two requirements compete, because the tabs are formed from the same material that is already being stretched by the draw and the amount of springback at each tab depends on how much that particular piece of the blank was drawn.
The result is that a tab plane which is flat in the free state may not be flat after the pan is drawn, and the tabs across a diagonal from each other tend to move together, which makes the error look like a warp rather than like four independent faults. On a pan of 100 to 200 mm across with 0.8 to 1.5 mm steel, a coplanarity of 0.2 mm across the four tab faces is a realistic requirement, and 0.1 mm requires either a restrike that sets the tabs against a hard stop or a separate forming operation for the tabs.
The measurement has to be done the same way the part is used. Checking the tabs while the cover sits on a surface plate only shows which tab is long. What matters is the gap under each tab when the cover is seated and one or two fasteners are snugged, because that is the state in which the cover will be bolted down. The practical production check is a go and no-go fixture that seats the cover and measures the gap at each tab with a feeler or a dial gauge, and it should be applied to the first article and at intervals afterwards.
One stroke or two: how the tab gets made
Tabs can be formed in the same press stroke as the pan, with the tab detail built into the draw or the restrike tool, or in a separate station afterwards. The single stroke version is cheaper and keeps the tabs in a fixed relationship with the pan, since both are formed by the same tool in the same hit. Its problem is coupling: any adjustment made to the draw to fix the pan depth also changes the tabs, and vice versa. This is why a tool that produces a perfect pan can be adjusted into producing four slightly wrong tabs, and why the debugging of a combined tool can take several rounds.
A separate tab station decouples the two. The pan is formed and corrected first, then the tabs are formed in a tool that locates on the finished pan wall or on the flange. Each can now be adjusted without disturbing the other, and the tooling for the tab station is much simpler because it only has to form the tab. The cost is one more operation, one more handling step and one more opportunity to damage a finished pan. For a part where the tabs are the critical feature, the split is usually worth it; for a part where the pan is critical and the tabs are forgiving, the combined tool is the right call.
Tabs, paint and the path to earth
A painted cover with mounting tabs has a finishing problem that is easy to overlook: the tabs are the electrical contact between the cover and the structure it is bolted to. On equipment that has to be earthed through its fixings, paint under the tab is an insulator, and the connection becomes intermittent as the paint creeps under the tightening load. Wherever an earth path is required, the tab underside should be masked, or a dedicated earthing stud or pad should be provided with its own masking.
The same logic applies to the mating face of the pan. A drawn cover painted all over will not sit flat on a painted surface, and the paint film will cold flow under the bolt load over time, which loosens the joint. Masking the seating face and the tab undersides is one masking operation and it solves both problems at once. The masking list is worth putting on the drawing explicitly, because it is the one operation that is cheapest to specify and most expensive to add after the parts are painted.
Paint also changes the tab geometry. A powder coat of 60 to 100 microns on each face thickens a 1.0 mm tab by 0.12 to 0.2 mm and rounds the root radius slightly. On a tab whose fit depends on its thickness, such as one that slides into a slot, this is significant. As with every coated part in this family, the drawing should name the state in which the tab dimensions apply, and a tab that locates in a slot should be specified after coating with a stated film thickness range.
Questions asked before a tabbed cover pan is quoted
Should the tabs be rigid or flexible? Decide this first. If the assembly has a gap that varies, flexible tabs are cheaper than a precision cover; if the cover locates something, rigid tabs with a position tolerance are the only option.
What is a realistic coplanarity across the tabs? About 0.2 mm for a drawn pan with tabs formed in the restrike, and about 0.1 mm where the tabs are formed in a separate station against a hard stop. Tighter than that is possible but should be justified by the function.
Do the tabs need a gasket? If the cover seals, the gasket decides the joint and the tabs only supply the clamping. In that case the gasket compression range sets the tab load, and the tabs should be sized to deliver it rather than being sized to survive the bolt.
How is the part verified? Dimensional checks on the pan and tab positions on the first article, a seating fixture for the tab coplanarity, and a functional check of the assembly with its gasket or mating component. A tabbed cover should always be checked assembled once, because the failures on this part come from the joint and not from the individual dimensions.
Sizing the draw for a part like this — reduction per station, ironing allowance, flange width — is covered step by step in our deep drawn covers guide.
Specifications
| Item | Steel Deep Drawn Cover Pan with Mounting Tabs |
|---|---|
| Brand | AUNOV |
| Designing | Send drawings, or send a pan sample to be measured, a manufacturability review comes back with the quotation. |
| Tooling | Dies engineered and produced in our own toolroom, stored under your part number. |
| Samples | First-article samples ship with dimensional data plus material certs. |
| Materials | Carbon steel (SPCC / DC01) leads the stock list for this part, alongside 304 / 316 stainless steel, aluminium, brass and copper, per the drawing. |
| Surface finish | Finish options: plating, e-coat, powder coating, anodising or passivation, as called out on your print. |
| Processing | Staged deep drawing, with in-line annealing where the draw ratio requires, then pierced and CNC-machined in house. |
| Equipment | Mechanical presses 5-250 T, hydraulic presses 250-500 T, CNC turning centres and a climate-controlled CMM room. |
| Tolerance | Drawn tolerances held to +/-0.1 mm, with machined features to +/-0.03 mm. |
| Delivery terms | FOB standard, DDP offered for EU and US, T/T and L/C; D/P on repeat accounts, blanket orders and call-offs supported. |
Frequently Asked Questions
What is a mounting tab on a deep drawn cover pan for?
A tab either locates the cover rigidly against a surface, in which case it must be rigid and its position controlled, or it holds the cover down while absorbing the mismatch between the cover and what it mounts to, in which case it should be compliant and its flexibility matters more than its position. Both are correct engineering and both look identical on a drawing that just says four tabs with a hole.
Where does a tabbed cover pan fail?
At the tab root. A compliant tab formed too stiffly rattles because the flexibility that was meant to take up the gap is gone, and a rigid tab formed too thin cracks in bending because every assembly gap now loads the tab. The root section is the controlled feature, and the drawing has to state which job the tabs do.
How are the tabs formed on a drawn cover pan?
The tabs are drawn or formed in one or two strokes off the pan datum and kept in one plane so all four seat together, rather than welded on as separate pieces. Forming them as part of the shell is what keeps them related to the pan without a second setup that drifts.
What is the minimum order for a tabbed cover pan?
Runs start at 1,000 pieces, with tooling made in-house to your print. We return a quote within 24 hours of the drawing, and first articles are checked on the CMM before the full run, so the tab intent – rigid or compliant – is confirmed on metal first.
Related Products


Request a Quote for This Part
Send a drawing or sketch — get material advice, tooling cost and a per-piece price within 24 hours (working days).