
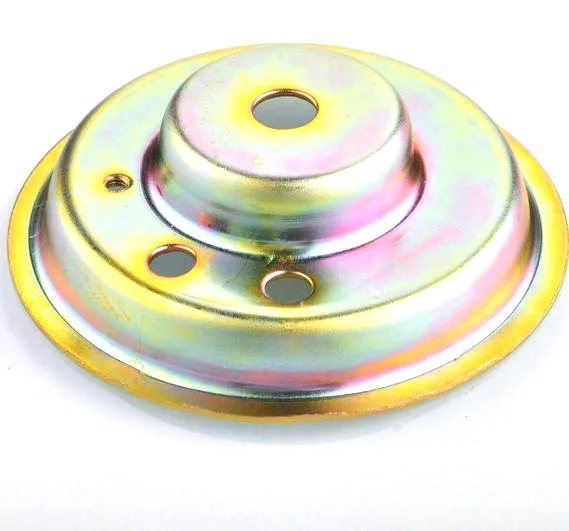
A multi-dome cover plate is a drawing with a different process, and it needs a different review
A multi-dome deep drawn cover plate is a single piece of sheet metal that contains more than one raised dome, usually for buttons, indicators, or access points. It looks like a shallow tray with bumps in it, and it is one of the few products in this family where the process plan is not obvious at all – because a dome is a deep draw in a shallow plate, and doing several of them in one piece changes the material’s flow in ways a single dome does not.
We deep draw from coil or blank with in-process annealing so walls thin evenly, and every stage is logged against your part number, on mechanical presses from 5 to 250 T and hydraulics 250-500 T with in-line annealing furnaces, secondary operations on CNC turning centres, and CMM inspection. Tolerance runs +/-0.05 mm to +/-0.1 mm across the part with wall thickness held to print, and dimensional reports accompany the first article. Carbon steel, 304 and 316 stainless steel, aluminium and brass are all held in stock, with the final grade fixed at the drawing review. Finish is selected from the drawing – plating, coating, anodising or passivation – with the agreed finish travelling with the part number. This page is about the mechanics of multiple domes, and about the four things that go wrong when more than one is present.
Why one dome is easy and three are not
A single dome in a plate is a local draw. The material flows radially into the dome and the plate around it barely moves. The consequences are that the dome’s wall thins as it forms, the plate around it stays put, and the dome’s depth is limited by the punch’s stroke and the material’s forming limit.
With multiple domes, three things change immediately:
- The domes compete for material. A deep dome that is close to another dome draws material away from the region between them, and the region between two deep domes is where the material is most depleted. If the domes are too close or too deep together, the web between them will thin and may tear.
- The second dome forms in already-worked material. A dome formed second is being drawn from sheet that has already been strained by the first dome. Its forming limit is lower, and it will thin more and may crack. This is why a multi-dome part is usually a multi-stage draw with annealing between the stages – and it is why the sequencing is not optional.
- The plate’s flatness is at risk. Forming several domes leaves residual stresses distributed around each one, and these interact. The plate between and around the domes will move, and on a cover plate whose surface has to be flat – because it mounts to something, or because it is visible – this movement is a problem.
The four things that go wrong, and their fixes
| Tearing between the domes | Where two deep domes are close together, the web between them is stretched in two directions and thins most. The fix is to increase the web width, reduce one of the dome’s depths, or add a drawn rib or bead in the web – which puts material back where it is needed and is a much cheaper solution than reducing the product’s function. |
|---|---|
| Dished plate around the domes | Forming raises material out of the plate and leaves the surrounding plate under stress. On a large plate with shallow domes this shows as a gentle dish; on a small plate with deep domes it can be severe. The fix is a doming or coining operation on the final station, or an annular rib around the domes which is a designed stiffener rather than a repair. |
| Springback in the domes | A dome is a bend in three dimensions, and it springs back. The result is that the dome’s height and its shape after release depend on the material’s condition. On a cover plate where a button has to protrude through a hole in the dome, the dome’s height after springback is a functional dimension, not a cosmetic one – and it needs a defined tolerance against a flat datum. |
| Dome height variation between units | If several domes are at different depths or the material varies, the domes’ heights vary individually. On a multi-button cover where each button must protrude the same amount, this is a functional tolerance and the domes’ heights should be specified relative to the plate’s face, with the datum clearly named – the flat plate surface, not the table it happens to sit on. |
Wall thickness, held to print, and why it matters here
Wall thickness held to print is the right specification on this part, and it is more than a formality. On a multi-dome part the wall is the part’s whole structural content – a cover plate is a membrane between the domes – and the thinning from the draw is uneven and compounded. The requirements:
- The minimum wall is not on a dome; it is in a web between two domes, or at the base of the deepest dome. This is the thinnest region of the whole part and it is where a crack or a tear would start.
- The dome’s wall is thinnest at its shoulder, where the material changes direction most sharply – at the top of the dome’s radius, not at its top. A dome’s height is controlled by its shoulder region, and a tight shoulder radius is where the part fails.
- A cover plate that flexes is a cover plate that cracks. A thin web between two domes is a membrane, and it will deflect if anything presses on it – a button, a finger, a mounting point. If the part is expected to be handled or to have buttons pressed, the web’s thickness and the presence of a rib are what stop it deforming permanently.
Multi-stage drawing, and the sequencing that has to be right
Deep drawing from coil or blank with in-process annealing so walls thin evenly – on this part that means more than one stage, and the sequence matters more than usual:
- Which dome goes first. The largest and deepest dome is usually drawn first, because it needs the most ductile material and the most material flow. A small shallow dome drawn last has an easier job.
- Whether the domes are drawn in one tool or two. Two domes side by side that do not interfere can sometimes be drawn in the same operation, and this is much cheaper. Where they are too close, they have to be sequential with annealing between.
- Where the piercing happens. A button hole in a dome cannot be pierced in the flat – it has to be pierced after the dome is formed. A slot in the plate between domes can be pierced in the flat. The distinction determines the die’s station count and it should be resolved at review.
- Where the coining or doming happens. A final sizing operation on the plate’s face is what holds the flatness, and it needs to be a planned station, not an aspiration.
Material, and why this part’s grade matters more
Carbon steel, 304 and 316 stainless steel, aluminium and brass are all held in stock, with the final grade fixed at the drawing review. On a multi-dome cover plate, the material’s formability is the limiting factor rather than its strength:
- Aluminium takes the deepest multi-dome draw most easily, and where the part is a button or indicator cover in a consumer product this is usually the right choice. 3003 is the general grade and 1050 is the most ductile if the domes are deep.
- Carbon steel is the choice where the cover needs stiffness, where a plated or painted appearance is wanted, and where a cost target is tight. It draws less easily than aluminium, so the domes need more generous shoulder radii.
- 304 or 316 stainless steel where the environment or a hygiene requirement dominates. Stainless Steel is the least formable of the group for a multi-dome draw, and it will need more stages and more annealing – which shows up in the cost and the schedule.
- Brass is used where a warm appearance or a specific corrosion behaviour applies, and it draws well.
Finish, and the domes are where it varies
Finish is selected from the drawing – plating, coating, anodising or passivation – with the agreed finish travelling with the part number. On a multi-dome cover plate, four finishing points:
- Coverage inside the domes. This is the same coverage problem as any deep drawn cavity, and it is worse on a domed part because the dome’s interior is a curved closed surface that a spray cannot reach evenly. A domed part is normally a barrel-plating or a rack-plating decision, and the finish will be thinner inside the domes than on the flat.
- A coating on a dome changes its shape. A powder coat on a dome rounds the shoulder, because the shoulder is a small radius and a thick film fills it. On a part where a button protrudes through a hole in the dome, this changes the effective clearance. Anodising is the best-behaved option here because it grows very little.
- Masking the button holes, where anything passes through or seats in them.
- Appearance reference on a visible part. A multi-dome cover is usually a visible consumer-facing part, and a retained reference sample is worth more than a finish code, because the appearance across a domed surface is the product.
Each dome is a tool, a cycle time and a risk
Eight things, and the first three are the ones that determine whether this part is makeable at all:
- Each dome’s depth and diameter, and the web width between adjacent domes. This trio determines whether the draw is feasible.
- Minimum wall thickness, and where it is – stated at the web or the dome’s shoulder, not at the plate’s face.
- Dome height tolerance, and the datum it is measured from, specified as the plate’s face and not the table it sits on. This is a functional dimension if anything protrudes through the domes.
- Plate flatness against a named surface, and whether the plate is between or outside the domes.
- Which holes are pierced in the flat and which after forming, since a hole in a dome cannot be pierced in the flat and this affects the die plan.
- Shoulder radii at each dome, which control the thinning and the dome’s final shape.
- Which surfaces are masked, and whether dimensions apply before or after the finish.
- Material grade, confirmed at the drawing review, because the dome depths are only achievable in a formable grade.
How many domes does this part really need?
How many domes does this part really need? Each dome on a multi-dome plate costs a die station, a thinning problem, a springback problem, and a flatness problem – and the cost grows faster than linearly as they get closer together. Where several of the domes are purely cosmetic – a raised decorative area rather than a functional button or access point – they can often be embossed in a single operation rather than drawn as separate domes, at a fraction of the cost and with none of the thinning consequences. Embossing gives a raised area; drawing gives a hollow dome. If the dome does not need to be hollow, it does not need to be drawn. That single question often removes most of the difficulty from a part like this.
If you are comparing this part with a machined or welded alternative, the guide to deep drawn covers lays out where drawing wins, where it loses, and what it costs either way.
Specifications
| Item | Multi-Dome Deep Drawn Cover Plate |
|---|---|
| Brand | AUNOV |
| Designing | The drawing is reviewed first; the agreed version then governs every batch. |
| Tooling | Tooling is built to the drawing and held against your part number for the life of the part. |
| Samples | Pre-production samples come with a full inspection report, so the sample is retained as the master, and production starts only after your written sign-off. |
| Materials | Carbon steel, 304 / 316 stainless steel, aluminium and brass are all held in stock; the final grade is fixed with the drawing review. |
| Surface finish | Finish selected from the drawing: plating, coating, anodising or passivation; the agreed finish travels with the part number. |
| Processing | Deep drawing from coil or blank, with in-process annealing so walls thin evenly; every stage is logged against your part number. |
| Equipment | Mechanical presses from 5 to 250 T and hydraulic presses 250-500 T, with in-line annealing furnaces; secondary ops run on CNC turning centres, inspection on the CMM. |
| Tolerance | +/-0.05 mm to +/-0.1 mm across the part, wall thickness held to print; dimensional reports accompany the first article. |
| Delivery terms | FOB, with DDP offered for EU and US addresses, T/T or L/C, with D/P accepted on repeat business; each volume tier carries its own quoted price. |
Frequently Asked Questions
Why are multiple domes drawn into one cover plate instead of welded on?
Drawing the domes into a single plate keeps them concentric and the wall seamless, where welding separate bosses on would add seams and a second setup that drifts out of position. For a cover where the domes locate other parts, the one-piece form is stiffer and cleaner inside, and it removes the leak path a welded joint would introduce.
What tolerance holds the dome height and spacing on a multi-dome plate?
Dome height and pitch are set by the tool and held to a few hundredths of a millimetre, then checked on the CMM, because the parts that seat on those domes depend on the spacing being repeatable across the run. The rim and the flat reference face are held to their own bands so the whole plate sits square.
Which material is used for a multi-dome deep drawn cover plate?
Stainless steel is typical for corrosion duty, with 304 or 316 chosen for the environment; aluminium is used where weight decides. The grade follows the service condition, and mill certificates with heat numbers accompany the first article.
What is the minimum order quantity for a multi-dome cover plate?
Production runs start at 1,000 pieces, with tooling made in-house to your print rather than a catalogue shape. We return a quote within 24 hours of the drawing, and first articles are measured on the CMM before the full run begins.
Related Products


Request a Quote for This Part
Send a drawing or sketch — get material advice, tooling cost and a per-piece price within 24 hours (working days).