
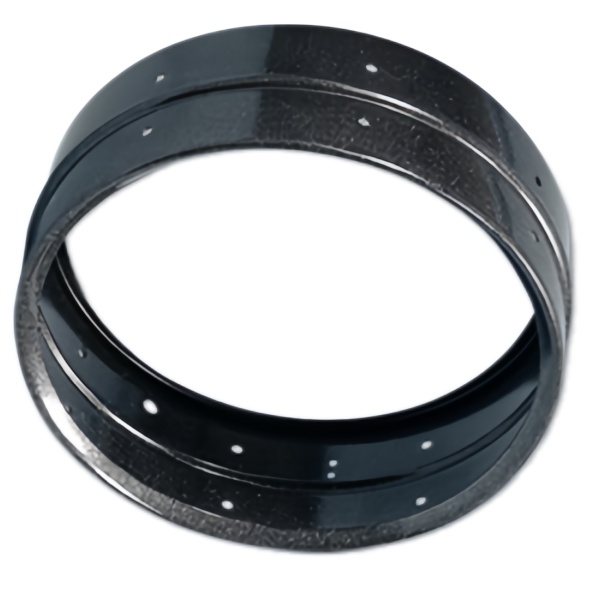
A ring band is a shell, not a beam
When a ring band is loaded radially, it does not behave like a bracket. It behaves like a thin cylindrical shell, which means the load is carried around the circumference in hoop tension and compression rather than along a straight path from the load to a support. That single difference changes what has to be controlled. A bracket is judged by its deflection under load and its fatigue life at the root. A ring band is judged by its roundness, because the moment the band is no longer round the load stops being shared evenly around the circumference and starts concentrating at a few points.
The practical result is that roundness is not one dimension among many on this part. It is the specification. A band that measures perfectly on diameter and is oval by 0.4 mm will grip unevenly, will leave a gap under half its circumference, and will be returned as a fit problem even though every dimension on the drawing was respected.
Roundness is the whole part, and it has to be measured the right way
Roundness and diameter are independent properties, and a batch can be entirely in tolerance on diameter while being unacceptable on roundness. Two measurement methods dominate. A three-point bore gauge or a pair of calipers measures across a diameter, and it will happily pass an oval part if it happens to be measured across the long axis. A CMM or a dedicated roundness instrument rotating the part about its own axis measures the actual profile and gives the number that matters.
For a band formed from 1.0 to 1.5 mm steel at a diameter of 60 to 150 mm, a roundness figure of 0.10 to 0.15 mm is achievable and a figure of 0.05 mm is achievable with a sizing operation but not from the draw alone. Two details decide whether the measurement is meaningful. The first is the measuring plane: a band that is round at mid height and oval at the ends is not round, because the ends are what locate against the mating part. The second is the state of the part. A band measured free springs open or closed compared with the same band measured clamped on its mounting face, and the clamped figure is the honest one if the part is used clamped. State which one the drawing refers to, because the two can differ by more than the tolerance band itself.
- Roundness at the ends, not only at mid height.
- Measured about the part axis, not across a diameter.
- Stated free or clamped, and if clamped, at what bolt torque.
- Measured after any sizing, painting or plating step that can move the profile.
Holes around a circle: pitch, chord and the drift nobody plans for
Holes distributed around a band are usually positioned by an angular pitch and a common height. The angular part is where the errors hide. A small error in angular position turns into a much larger linear error at the edge of the band, because the arc length grows with radius. At a radius of 50 mm, an angular error of half a degree moves a hole by about 0.44 mm; at a radius of 150 mm the same half degree moves it by 1.3 mm. That is why angular tolerances in degrees should almost never be used on a hole pattern without converting them to a linear figure at the relevant radius first, and why the drawing is better off giving hole positions as a linear pitch along the circumference whenever the pitch divides the circle exactly.
The second source of drift is the forming sequence. If the holes are pierced into the flat blank before the band is formed, the banding operation moves them. Each hole migrates by an amount that depends on its position relative to the bend or the draw, and the migration is systematic rather than random, so it does not average out over a batch. If the holes are pierced after forming, they stay where the tool puts them, but the tool now has to locate on a round shell, which is a more expensive and less rigid proposition. On bands where the hole position matters, the normal answer is to form first, then pierce in a second station with the part located on the inside diameter.
Height and wall: the two numbers behind the clamp load
A ring band that acts as a clamping element carries load through its wall in hoop tension. The wall thickness sets how much hoop stress a given clamp load produces, and the band height sets how much of the mating surface is engaged. These two are not interchangeable. Doubling the height roughly halves the pressure on the interface without changing the hoop stress, while doubling the wall roughly halves the hoop stress without changing the interface pressure. Which of the two is the limiting factor determines where extra material should go, and the answer comes from whether the failure mode is interface slippage or band yielding.
Where the band also has mounting holes, the wall between the hole and the free edge is a design feature rather than leftover material. A hole placed closer than 1.5 times the material thickness to a free edge will pull out or tear at a fraction of the load the band could otherwise carry. The same applies between two adjacent holes: the ligament between them carries the load that the material removed by the holes would have carried, and if the ligament falls below one material thickness the band will crack between the holes long before it yields anywhere else.
Rolled and welded, or cut from a drawn cup
There are two normal routes to a ring band of this class, and they hold different tolerances. The first is to roll a strip into a cylinder and weld the seam. This gives an excellent, essentially perfect roundness after sizing, an unlimited height, and a wall thickness chosen from strip stock. Its weakness is the seam: the weld is a different material state from the parent metal, it distorts on cooling, and if the band is plated afterwards the seam is where the plating behaves differently. The second route is to draw a cup and cut the bottom and the top off, which produces a seamless band with no weld and a wall thickness that varies slightly from the bottom to the top of the original cup. It is the better answer visually and for corrosion, and it is limited in height by the draw ratio.
For a shallow band, cutting from a drawn cup is usually the cheaper and the cleaner route, and the wall variation from the cup can be pushed outside the band by trimming more generously. For a tall band, rolling and welding wins on material utilisation, because drawing a tall cup from a flat blank wastes most of the blank in the bottom that gets cut away. The choice also interacts with the finish: a seamless band anodises or plates evenly, while a welded band shows the seam as a line, and a painted band hides it entirely.
- Drawn and trimmed: seamless, wall variation along the height, height limited by draw ratio.
- Rolled and welded: constant wall, seam as a material discontinuity, height unlimited.
- Both routes can be sized after forming to tighten roundness.
- The route chosen determines whether plating shows a seam.
How we verify a ring band before it ships
A ring band lives or dies on roundness and on the position of its mount holes, so verification centres there rather than on the overall length. The first article carries the full CMM map; production holes are gauged by attribute and the roundness is checked on a defined sample.
- CMM the ID and OD roundness and concentricity; the band must sit true on its mating spigot, not just be the right average diameter.
- Verify every mount hole against the pitch circle with a coordinate or go/no-go plate; chord error between adjacent holes is the number that matters, not the individual position.
- Check hole size including the coat thickness so a painted band still clears the fastener after finishing.
- Confirm band height and wall against the clamp-load calculation; a thin or short band relaxes the joint.
- Adhesion and edge coverage check on the black finish, with extra attention to the sheared hole edges.
- File the CMM map, hole report and coating record under the part number for repeat orders.
Draw ratio, wall thinning, radii and trim — the design decisions behind a part like this are worked through with numbers in our deep drawn covers guide, and the Precision Deep Drawn Parts pages collect the rest of the family.
Specifications
| Item | Black Steel Deep Drawn Ring Band with Mount Holes |
|---|---|
| Brand | AUNOV |
| Designing | Share your print, or send a part to be measured, DFM feedback is returned with the quote. |
| Tooling | Dies engineered and produced in our own toolroom, held and maintained under your part number. |
| Samples | First-article samples ship with a full dimensional report and mill certificate. |
| Materials | Carbon steel (SPCC / DC01) leads the stock list for this part, alongside 304 / 316 stainless steel, aluminium, brass and copper, with grade selection confirmed at drawing review. |
| Surface finish | Plating, e-coat, powder coating, anodising or passivation, as called out on your print. |
| Processing | Staged deep drawing, with in-line annealing where the draw ratio requires, with piercing and finish machining under the same roof. |
| Equipment | Our press floor runs 5-250 T mechanical and 250-500 T hydraulic presses, CNC turning centres, climate-controlled CMM room. |
| Tolerance | Tolerances to +/-0.1 mm as drawn, machined features held to +/-0.03 mm. |
| Delivery terms | FOB is standard; DDP offered for EU and US, T/T and L/C; D/P on repeat accounts, blanket orders and call-offs supported. |
Frequently Asked Questions
Why is roundness the specification rather than one dimension among many?
A radially loaded band does not behave like a bracket; it behaves like a thin cylindrical shell carrying load in hoop tension and compression around its circumference. The moment it is no longer round, the load stops being shared evenly and starts concentrating at a few points, so a band that measures perfectly on diameter and is oval will leave a gap under half its circumference.
Why do holes around a circle drift in pitch?
Pitch is measured on a chord, so any loss of roundness redistributes the arc length between adjacent holes even when each hole is individually in position. The drift is rarely planned for because it is not visible in a single dimension check, and it shows up as a clamp that goes on tight at two bolts and loose at the rest.
What sets the clamp load a band can deliver?
Height and wall together. The wall carries the hoop tension the clamp generates, and the height decides how much contact line there is to convert that tension into grip, which is why improving one without the other rarely improves retention.
Rolled and welded, or cut from a drawn cup?
A drawn cup starts seamless and consistent, and cutting from it gives a uniform wall and no seam to finish or trust. Rolled and welded suits sizes and volumes where a drawn shell is not economical, and the choice is made against required roundness and duty rather than on habit.
Related Products


Request a Quote for This Part
Send a drawing or sketch — get material advice, tooling cost and a per-piece price within 24 hours (working days).